Sidebar
Table of Contents
InstantX for Audrey (beta 1)
April 7th, 2009. These are InstantX templates. They require the latest beta build of X2Web. Assuming a working X2Web install installing the new template is simple. Unzip the file, copy to your web root and rename the folder to something that makes sense for you. Do not leave the folder name unchanged as this is alpha software and contains no password protection yet.
While I'll be giving the examples here on an Audrey These pages are designed to be easily altered to run on just about any older browser device. The full instantx pages make extensive use of css and xmlhttp/ajax. These pages are specifically designed not to use any of these newer technologies. Versions specific for the nokia web tablets (which work already with this but dont look so nice yet) are coming as well. In the mean time you should be able to get this working on just about anything with a little tweaking.
Example Setup
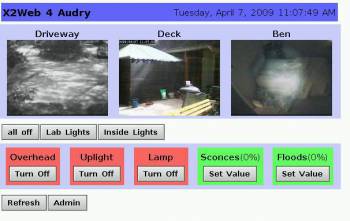 Here's an example of the setup currently possible. You see a header with the title and date, some video thumbnails a button to run a global script, 2 buttons linked to unit lists for controls. Then another line with some individual unit controls, simple toggles as well as set value buttons for dimmable units, or for units for which you want to be able to access the in/for and other settings of. Lastly a refresh button and a link to the admin pages. You dont have to include those, you can use the refresh button in the browser and you can just manually type the link to the admin.x10 page inside the directory.
These screenshots are from an Audrey, but any device that renders a form button in a half way decent manner should be able to render these pages.
Configuration Screen
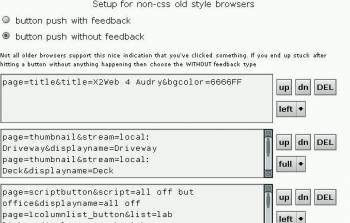 When you first access the whatever/index.x10 page you'll be redirected automatically to the admin screen where you can begin setting up your control page. This is a little more involved than the setup for the more advanced instantx pages since these browsers just aren't capable of complex interfaces. This is configured similarly to the Inline Unit module of the main InstantX. Each row in the window is configurable with any number or combination of little blocks that you configure by entering strings of name=value pairs. Separated by &'s just like the GET string from a browser, but no escaping of odd characters is necessary. The format for all lines is name=value&name=value&name=value with each block getting it's own line in the field. You do not need to edit this configuration on the device itself, it may be easier to do this in a modern browser. But it's setup so that you can probably do the work on the older device if you wish.
Feedback Selection
The Audrey is able to do a little javascript and so the default is to write the name of the button you've pushed to the center of the screen and then redirect to the control page. This is handy as it lets you know that something has happened, that it got your button push and that you're waiting for something to finish. Not all devices support this, for example the original nokia tablets can't do this. If on your device you click a button and you get an empty screen and nothing happens, or if the name of the button appears and then nothing happens, then you'll need to turn this off, if it works and you like it, use it.
Row Configuration
each row consists of the string of name=value pairs. In addition you can use the buttons to the right to move the row up or down, delete the row and select it's alignment. Left and Full are currently available.
When you've finished entering the setup for a row, you can select to “save and return” which will save the data and then load the page so that you can see what you did. Or click the “save and add another row” button which will save the row data and return to the admin screen with another empty line at the bottom for adding another row.
each line in the field can be either a block config of name=value pairs separated by the & ampersand character or it can be regular text or html code. If it's regular text that will become an entry in the row. For example if I wanted a label to the left of my blocks I could write “outside units:” on the first line of a row field and then add as many unit control blocks as will fit afterwards.
Available Row Modules
To configure a block the line must begin with “page=” followed by one of these currently valid blocks, or one of your own if you have added some. If you need to tweak any of the blocks to render properly I recommend you make a copy, give it a unique name and tweak that one, that way future updates are less likely to overwrite your work.
Header
page=header&title=Master Bedroom Remote&bgcolor=6677FF
The header module is special. If you make a row into a header then that is the only block that you can include. 3 parameters are required:
- page=header
- title=something to write at the top
- bgcolor=445566 to set the background color of the header row.
You can make any number of rows into headers, but each header row can only include the header and no other pieces of text or blocks.
Thumbnail
page=thumbnail&stream=local: Driveway&displayname=Driveway
Makes a thumbnail image of a live video stream. The stream can be either a quicktime stream directly from XTension or an IP camera connected to XTension via Video Pitcher Three parameters are required:
- page=thumbnail
- stream=the name of the stream as seen by XTension
- displayname=the title you want drawn over the stream
As of this moment the thumbnails are captured live prior to serving up, but you cannot click them and watch a live stream yet. Depending on the capabilities of your browser this may be possible in a future build.
Script Button
page=scriptbutton&script=all off but office&displayname=all off
Makes a button that executes a global script in XTension. Three parameters are required:
- page=scriptbutton
- script=the name of the global script
- displayname=how you want the button captioned
One Column Unit List
page=1columnlist_button&list=lab lights&displayname=Lab Lights
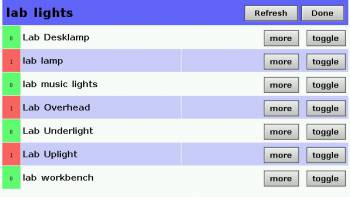 Creates a button that links to a single column list of units to control, the units are taken from the list whos name you pass. Three parameters are required:
- page=1columnlist_button
- list=the name of the list from XTension
- displayname=The caption you'd like the button to have
from the list you can do simple toggles of any of the units, or click the “more” button to get the more detailed control screen to do dimming or in/for block/unblock buttons for the unit.
Two Column Unit List
page=2columnlist_button&list=inside lights&displayname=Inside Lights
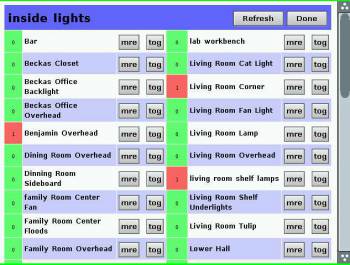 Creates a button, identical to the one column one except that it links to a page that shows the list in 2 columns. This doesn't quite fit on the Audrey screen so I had to shorten the toggle and more button labels. If yours does you can tweak those by editing the “unitlist_2column.x10” file in the folder. See the beginning of the file for the “ToggleControl” and “SetControl” tags. It otherwise functions the same as the single column version but may enable to you avoid having to scroll. Inside the file as well you'll find the oncolor and offcolor tags which you can edit to change the green/red to something else if you choose. Remember that there will be many updates to this before release and you'll have to re-add anything you change to these with every update. Or copy the files to a different name and edit those.
Toggle Button
page=togglebutton&unit=lab overhead&displayname=Overhead
offers a colored block with a button to toggle the named unit. The colors are configurable by editing the togglebutton.x10 snippet. Three parameters are required:
- page=togglebutton
- unit=The name of the XTension unit you wish to toggle
- displayname=the caption you'd like the button to have
This is identical to the toggle button in a unit list, but allows you to place some units on the main page for quicker access.
Dim Button
page=dimbutton&unit=driveway sconces&displayname=Sconces
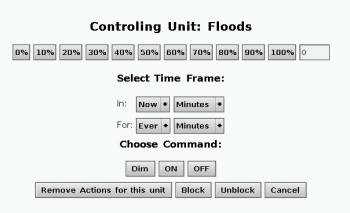
Button for a dimmable unit, or a unit for which you'd like to access the in/for times and block/unblock buttons. The resultant control page is generated by javascript and so comes up much faster than hitting the server for onw would. Like the feedback however it may not work on all browsers. It is pretty simple and has worked on everything I've tested it with. If you find that on a particular device it does not work please let me know and I'll build in an option to pull it in a more normal fashion. Three parameters are required:
- page=dimbutton
- unit=the name of the XTension unit you'd like to control
- displayname=the caption you'd like the block to have on the screen
This is identical to what you get when hitting a “more” button from a unit list screen, but allows you to put it directly on the main page for faster access to specific units.
Refresh Button
page=refreshbutton
Click to refresh the page. Only the one parameter page=refreshbutton is required. This button is not necessary if you have available another way to refresh the page. The page also automatically refreshes via a meta refresh tag in the index.x10 page every minute.
Admin Button
page=adminbutton
Provides a link to the configuration/administration page. This is not necessary as you can simply type the admin.x10 link into the browser, but may be handy during the initial setup of a control screen so you can more easily switch back and forth to make changes and updates.
Download
These pages are available for download from: instantxaudrybeta.zip

