User Tools
Sidebar
Table of Contents
Vera (legacy plugin)
If you’re setting up a new system please use the new Vera UI7 interface As of 9.4.19 this legacy plugin is no longer included in the standard XTension distribution. If you need to run this plugin please download it directly from here and use the “install plugin” menu item in the Database menu to install it.
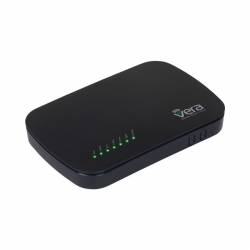
Vera is our preferred Z-Wave interface for use with XTension. It’s also the only supported interface that supports “secure” devices like remote controlled door locks.
 XTension is compatible with the original Vera models running UI-5 or later. It supports the Vera Lite, Vera Edge and the new Vera Plus which adds zigbee and bluetooth support running either UI-5 or UI-7 versions of their interface.
The Vera has it’s own web interface and mobile apps, why would you want to use it just as an interface to XTension? We think XTension has the best scripting interface and most customizable web and mobile web interfaces available. There is significant advantage to connecting to XTension and using that to run your logic rather than trying to link everything to scene changes. Your Vera units will live alongside any other device you can connect to. Instead of being limited to the actions in the Veras popup menus or learning to program in Lua you can write simple AppleScripts that can tie together any and all of the units in XTension or control other apps on your Mac. We also think we have the best DIY device support with protocols specifically designed for arduino devices and IOT sensors. While there are plugins for many such things for the Vera too, we think you’ll like our interface to them better and be up and running faster.
Networking Setup
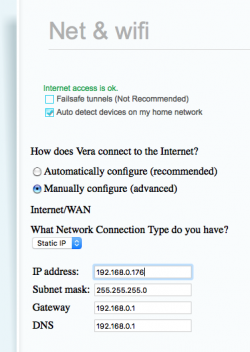
 In order to reliably connect to your vera you’ll need to assign it a static IP address rather than use DHCP which is it’s default. You can do this from the Vera web interface by selecting the “Setup” tab and then the “Net & Wifi” tab within that. For “how does Vera connect to the internet” select “Manually configure.“ From the popup menu labeled “what network connection type do you have?” select “Static IP” and give the device a unique IP address within your network. (see the Networking for Home Automation article for more info on managing your home network) If you have made changes to the default NAT and DHCP settings on your internet router or sharing device you’ll have to know what the rest of the settings are yourself. Otherwise there are 2 standard shared network types of which your network is very likely one or the other. If your network addresses start with 192.168.0.xxx then your subnet mask will be “255.255.255.0” and the gateway and DNS server entries should both point to the address of the router, which is most likely “192.168.0.1” If your address starts with 10.0.xxx.xxx then your subnet mask is probably “255.255.0.0” and the gateway and DNS entries should still point to the address of your router which is probably “10.0.0.1” If you’ve got other numbers there then you will need to consult the above linked article on networking to figure out the proper values.
The “LAN” settings also on this page are only used if you’re using the built in wifi to share an internet connection as if the vera was the access point. If your Vera does not have Wifi or if you’re not using it to connect then you can ignore these for now.
XTension Interface
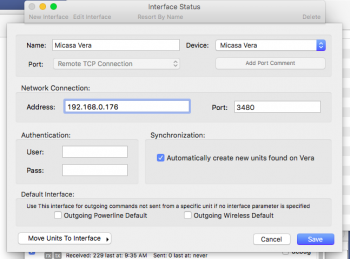
 From the windows menu in XTension select the “Interfaces” menu item. This will open the Interface Status window where you manage all the device level connections in XTension. Click the “new interface” toolbar item and a sheet window will open. From the “Devices” popup select “micasa vera” (we’ve supported them since before they dropped the micasa from the name) and the window will fill out with all the fields necessary to connect to the Vera. If you haven’t set a name for this interface “Vera main house”, “backup vera” or something like that the “micasa vera” name will be filled in. This is the name you will use when sending specific commands to the vera interface that don’t go through units.
Enter the same IP address into the Address field that you setup for your vera in the step above. The port number should not have to be changed unless you specifically edited those configurations on your Vera. Lastly if you’ve setup a user/password combination on your Vera you’ll need to set those too.
Click save and you’ll see a new entry in the Interfaces window. Click the “enabled” checkbox to begin communicating with your Vera.
When XTension connects it will first load the entire database from your Vera. 2 Lists will be created “Vera Units” and “Vera Scenes.” They will be populated automatically with all the units and scenes that are setup in your Vera. If you add new devices to the vera later they will automatically appear in XTension. Initially the names that the units have in the Vera will be carried over to XTension. XTension requires a unique name so if you’ve got a lot of devices that still have the default name on them XTension will add a pseudo random number to the end of the name. You can then change the name of the unit in XTension without affecting the name in the Vera, or use the “Send Name To Vera” button on the unit configuration window to make the change there too. Note that the UI-7 vera has limitations on the length of the name that XTension does not, so you may not be able to send a longer descriptive name to the Vera, but you can use a better name in XTension.
Any device the Vera can control you should now also be able to control in XTension. Most devices supported by Vera plugins should also carry over into XTension, however there is less structure to the plugin devices data and XTension may not know where the data is that is being sent, or what to do with that. In which case you can get any data sent from the Vera via applescript.
New in 9.1
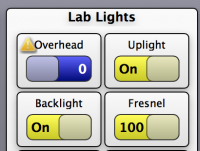
In XTension version 9.1 communication errors from the Vera are carried across and displayed as an alert triangle in all XTension lists, views and web remotes so you can see if there is a problem with the units and they might not respond. I find that in my own system the Vera is sometimes unable to poll a device and sets the communication error property for it even though it responds just fine to the next real command. I don’t know why some units do this, but it’s otherwise very useful to be able to see if a unit has a problem.
The Vera has it’s own web interface and mobile apps, why would you want to use it just as an interface to XTension? We think XTension has the best interface and most customizable web and mobile web interfaces available. There is significant advantage to connecting to XTension and using that to hold your logic. Your Vera units will live alongside any other device you can connect to. Instead of being limited to the actions in the Veras popup menus or learning to program in Lua you can write simple AppleScripts that can tie together any and all of the units in XTension or control other apps on your Mac. We also think we have the best DIY device support with protocols specifically designed for arduino devices and IOT sensors. While there are plugins for many such things for the Vera too, we think you’ll like our interface to them better and be up and running faster.


