User Tools
Sidebar
Do It Yourself (Legacy version)
NOTE: this page is for the original DIY plugin included in XTension up until it’s rebuilding with the newer plugin api in June of 2020. As of this writing this plugin is still included in the non-Catalina builds of XTension but will ultimately be removed in favor of the new DIY plugin. Please test your scripts with the New DIY Plugin. Please do not create new interfaces with the original DIY plugin at this time.
If you want to add some device that XTension doesn't currently support, you can roll your own using a wonderfully simple method using AppleScript and some special tools that XTension provides.
This method lets you connect to a native serial port, or a USB-serial adaptor, or even a ethernet based serial port, and you can switch between those connections without changing your AppleScript !!
In general, what we do is to create an 'interface' in the XTension communication prefs, establishing the 'port' and serial preferences, and create two 'well-known' scripts that will handle the opening of the port, and respond to input received from that port.
For example, I have a very old serial port multiplexer “the PIPE”, that I designed and built over 25 years ago that lets me switch between 16 ports, regardless of the serial port settings. In this example, I've set up two iMacs with USB-serial adaptors, both of which then connect to two ports on “the PIPE”. It's not obvious here, but “the PIPE” is already configured to pass any data received from one port to the other port… just a 'pass-thru' connection.
Here I'll show how to create the port, send data from one iMac to the other, receive the data, and conditionally send a message back to the first iMac. (note that the two iMacs are named “Wallace” and “Perelandra”…)
Let's create the first new interface handler on “Wallace”.
In the XTension FILE menu, choose Preferences, and the Communications Tab.
Then choose NEW…
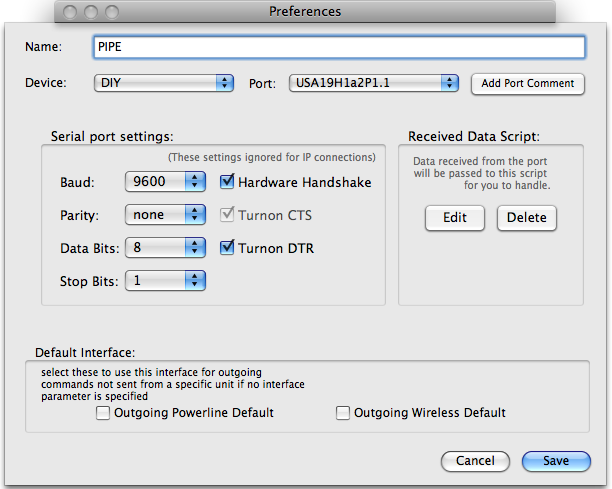
Here, I've entered the name of the interface, “PIPE”, and set the Port and the Serial settings already:

Notice that you must specify the baud rate, parity, bits per character, and stop bits. You also have the option of telling the interface to use hardware handshake, and whether to force DTR. (CTS is by default set on, because we assume that we have a full-duplex connection.)
Notice also that if you choose to have a remote TCP type connection, you probably have to set up the remote IP interface using the instructions for that 'bridge'. For example, with the Barionet, you use the web browser.
Now, you will want to set up the scripts for this DIY interface. CLICK on the Received Data Script EDIT button :

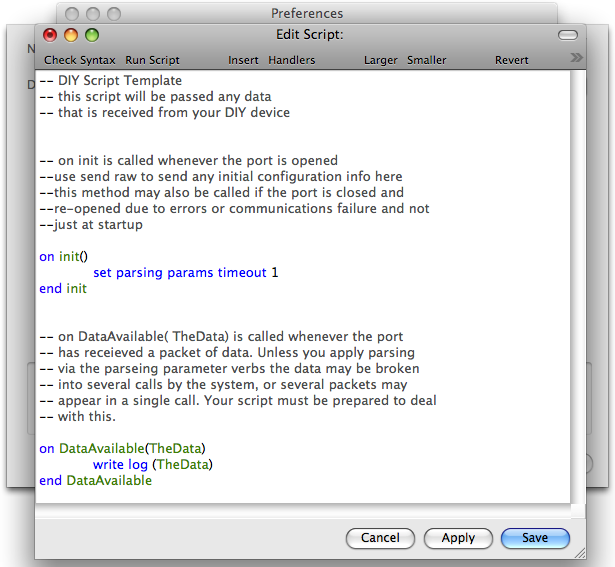
Notice that there are two 'handlers' here. The first one will be invoked every time you enable this DIY port, or whenever it is automatically restarted after some failure. In this handler, you will want to specify any handling preferences that are different from the defaults.
XTension provides a verb for setting these :

You can use these verbs anytime, but it's the most logical to use them here in the on init() handler.
The on DataAvailable() handler is the workhorse of the DIY interface system.
Here you put all the code that knows what to do when data is received from your device.
In this example, I simply write whatever I receive to the XTension Log, but this is a bit different on the 'other side' of this little show-and-tell…
Now, on the iMac named Perelandra, which is also connected to the PIPE by a USB-Serial adaptor, I have created a similar DIY port, and set up the on DataAvailable handler like this :
This handler will also write the received data to the Log, but will additionally test the input to see whether it contains the word : “Hello”. If so, it will send a message back to the PIPE, which will be passed thru the PIPE to the port that “Wallace” is connected, and thus it will be received by the DataAvailable handler which will write it to the Log on “Wallace”.
Update there are now 2 different onDataAvailable events you can use depending on the type of data that you’re receiving. The default handler now has 2 parameters, theDataAsString, and theDataAsBytes:
on dataAvailable( theDataAsString, theDataAsBytes)
you can process the data in the original way via “theDataAsString” parameter. Or if you’re doing something lower level and need easier access to the individual bytes in the stream you can use “theDataAsBytes” that is an applescript list with each element being the value of an individual byte that was received.
When talking to something that uses a binary protocol and not a text or human readable protocol it is possible that AppleScript will have trouble converting those non-printable characters into a string and may give you an error when data is received instead of passing it through to your script. If that happens then you need to use the alternate event called “binaryDataAvailable” which does not try to pass the data to you as text, but only as the binary list:
on binaryDataAvailable( theDataAsBytes)
any data including nulls or binary 0’s can be used in applescript via this handler. Both handler are available in the template script that is loaded when you first create a new DIY interface along with more discussion in the comments that surround it. You can only have one handler defined in the script at a time. If you switch to the binary one just comment out the original and the new one will be called instead.
Now, to start this all off, we're going to use the XTension verb “send data” and the ad hoc “Command Line” feature of XTension, to send a string out the PIPE DIY interface :

which will be passed thru the PIPE, to the iMac “Perelandra”, which will receive it via its DIY interface. There, the incoming data will be passed to the DataAvailable handler, which, as above, will write the message to the Log :

The handler will then see that there is the keyword “Hello” in the message, and will send back the “Hello Wallace” message…
Which will be passed to the DataAvailable handler on “Wallace”, which will write it to the Log :

Oh yes, don't be confused by that first line in the above snippet…that is just what XTension displays in response to the send data command … it's a text representation of the HexaDecimal value sent to the DIY interface. If you don't understand 'hex', or the difference between binary, hexadecimal, and 'displayed binary/hex', then you are probably in for some interesting times trying to debug your new DIY interface :)
Now I've probably made this example too complex by showing two copies of XTension, but this is something that you can set up yourself, without the PIPE in between. You just connect the two USB-serial adaptors together using a simple null modem (you do know what this if you're even thinking of doing a DIY interface ?)…
The Send Data verb has grown significantly since the first version as well. You can now send strings as you always could, but you can also send a list of individual bytes or numbers in specific C like syntax if you need to do so. See the wiki entry for the Send Data verb for more info on using those features.
Update: Notice that in the above example I am working with an interface that is TEXT only. IF you have an interface that uses ASCII HEX codes, you do not want to put spaces between the HEXITS. Also, for Binary protocols, note that James has implemented the entire AppleScript class for Hex, Octal and Binary codes. See the XTension Dictionary using Script Editor.
Sending commands from units
It is now possible for the DIY script to receive events when a unit assigned to your DIY interface changes state. The following handlers are also defined and documented further in the template script that loads when you create a new DIY interface.
 on SendOn( theUnitAddress)
  ...
 end SendOn
if you turn on a unit that is assigned to the DIY interface this handler in the scrip twill be called, it will pass you the address that you assigned to the unit and you can take any action you need to in order to send an on for that address via the SendData verb.
  on SendOff( theUnitAddress)
   ...
  end SendOff
similarly when a unit assigned to this interface is turned off this event will be called
  on SendValue( theUnitAddress, theValue)
    ...
  end SendValue
and lastly if it is a dimmable unit being set to a new value this event will be called in your DIY script. theValue is the Future Value that the unit is being requested to. You can change that value via the change future value verb. If you need to know the current value of the unit you can use ThisUnit to get the name of the current unit and use that and the value of verb to find out what it was previous to this command. This is useful if you need to calculate the difference between the 2 as some devices do rather than send an absolute value.
The value of the unit in the database is not updated until after these handlers return.


