User Tools
Sidebar
Table of Contents
Database Sharing
Database Sharing lets me share a selection, or all of the Units and Global Script from one XTension install to another. This is a great way to connect satellite installs with the main controller. The Units that show up at the target machine are a simplified interface and do not provide for editing the local properties or scripts on the sharing machine, but they do allow you to attach your own scripts to their remote actions as well as control them via any other XTension mechanism. Shared Global Scripts are added to a target submenu of the regular Scripts menu and can be executed on the remote machine by selecting their menu item on the target machine or via other local scripts on the target machine calling them by name. Please note that as of XTension 9.4.8 database sharing remains in beta and error recovery may not be quite as good as it should be. You can ameliorate this significantly with a few scripts that restart things in the case of errors, please see below.
Setting Up A Database Share
There are 2 plugins that work together to share Database components. The direction is always from the sharing machine to the receiving machine. For sharing that can take place across a local network or over a VPN you can avoid the overhead of encryption by turning off the SSH option and just connecting directly. If you’re connecting over the internet then you need to setup a passthrough into your system for an SSH connection. Setting up a NAT passthrough is beyond the scope of this document. You’ll want to get yourself a dyndns account of some sort and setup a NAT passthrough of the SSH port, or some other random high port, to the XTension machine you wish to receive the connection. The upside of the sharing always coming from the remote clients into the central one is that only the central coordinator needs the passthrough setup.
While there is no provision in the protocol for sharing units in 2 directions there is no reason you could not setup a sender and a receiver on both machines and sharing a subset of units across both of them. Make sure that you’re not sharing the same units back to the original sharing server though as that way lies madness and an infinite regress of messages going back and forth.
Database Receiver
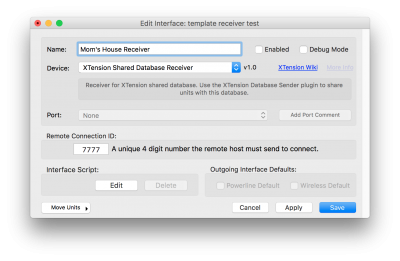
 Once you have an SSH passthrough setup, or not if it’s a local connection, you can setup the Receiver for this connection. Create a new Interface in XTension and select “XTension Shared Database Receiver” as the device type. The only other configuration option to setup on the receiver is to pick a unique 4 digit connection id. You’ll need to enter this same number into the Database Sender that we will configure in the next step. This is not a security measure, it’s just an ID number that lets this connection find the proper instance of the receiver in case you have multiple setup in the future. The Connection ID number must be unique among all other database sharing connections, or other remote connection interfaces of which there aren’t any yet but keep it in mind.
Database Sender
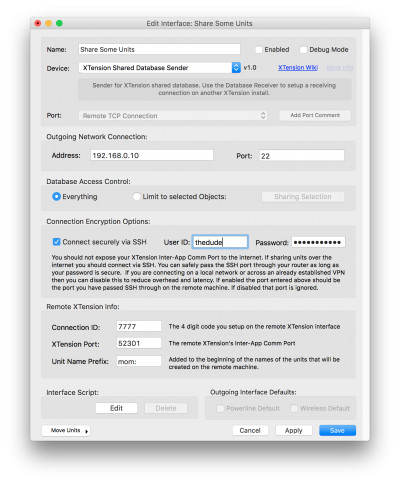
 On the sending machine create a new interface and select “XTension Shared Database Sender” from the Device popup. You’ll see more options here than in the Receiver. Fill in the “Outgoing Network Connection” with the IP address or DynDNS name of the system you want to connect to. If you’re using the SSH connection then put the port that you’ve passed through in the port field here. It is possible to have multiple high ports connect to different machines inside a NAT network. There is no need to passthrough the actual SSH port of 22 if you wish to use different numbers. That is up to your internet router to translate. You might have several machines that you would want to SSH into remotely all on different ports even though they share the same IP address. If you are connecting locally without using SSH this value is ignored and you can just leave it as 22 which is the SSH default.
Access Control
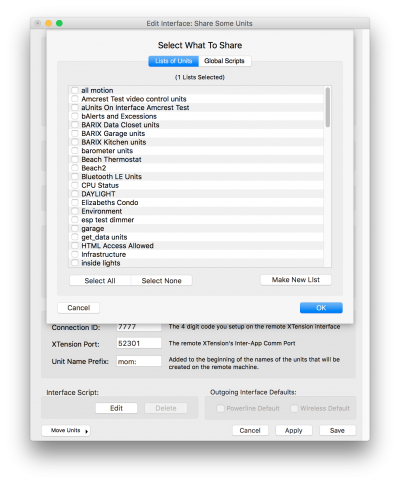
 In this field you decide what you want to actually share. It is not necessary to share the entire database. If you select the “Limit to selected objects” radio button then you can click the “sharing selection” button to bring down a window from which you can select which units and scripts you wish to share with this connection. Units are not selected individually, you can select one or more lists of units to share. Global scripts are selected individually and you will have to select specifically which ones you want to share from the list. You can add or remove Units from the shared lists at any time to have them show up on the remote machine or if you remove them they will refuse to be controlled from the remote machine any longer.
Connect Via SSH
As above, if you’re connecting on the same local subnet then you can avoid the overhead of encryption by unchecking the “connect securely via SSH” checkbox. If you are connecting over the internet or other unsecured network then you will want to use the SSH support rather than pass through the internal XTension communication port to the internet as a whole. In this field you should enter the username and password of the user that is signed into your receiving machine and running XTension. You will need to have remote access turned on in the sharing control panel on that machine and have the SSH passthrough already working. Setting up an SSH passthrough is something that is repeatedly documented on the internet for Macs so this should not be difficult to setup.
Remote XTension Info
Connection ID
The connection ID field must contain the same number that you entered in the Receiver configuration above. This number simply lets this sharing connection connect to the correct instance of a receiver on the receiving machine.
XTension Port
This is the port that the remote machine is running it’s inter app communications server on. This defaults to 52301. If you have never changed it in the XTension preferences then this is the correct number. It is not necessary to create a NAT passthrough for this port as the data will be tunneled over SSH to this port and not directly from the internet.
Unit Name Prefix
Every unit or script or other object sent from the Sender will add this prefix to the name before it is inserted into the database at the remote machine. In the example screen shot I’ve added “mom:”. Every unit being sent to me from Mom’s will have that added to the front of the name. This solves problems with name space conventions. I might have a “master bedroom overhead” unit at my house and mom might have the same. When sharing through this system mom’s will be named “mom: master bedroom overhead” and so avoid having the same name as my unit. When you access the unit on the receiving machine you’ll need to use the entire name with the prefix. Changing the prefix on the sending machine does not change the names of units already sent to the receiver, only new units. Once a unit is sent to the receiving machine it can be edited there with a new name or anything else and that will not affect the sending machines unit.
Remote Units vs Local Units
You cannot edit the settings of a shared unit on the Receiving machine. This is not a substitute for using VNC or other remote control system to setup and configure the remote machine. It does however let you add your own local scripts to the units on the receiving machine. For example I might have a motion sensor in my mom’s kitchen that is shared to my machine. I could have scripts that make sure the timestamp of that unit is updated each morning when she normally goes for breakfast. If it gets too late and there hasn’t been any motion in mom’s kitchen I might send myself an alert so I can call her to make sure she’s OK that morning. I might put a door/window sensor of one kind or other on the medicine cabinet and if she doesn’t open it in the evening before bedtime to take her meds it might send me an alert so I could call to remind her. All this is possible with scripts on the remote machine of course, but having the units local to the receiving machine makes dealing with them and their scripts so much easier. It’s possible to combine any number of machines in this fashion to a central hub machine, which could share them again up to other levels.

