Table of Contents
ESPresense
The ESPresense(sic) support is part of the MQTT client plugin. To use this please first setup an MQTT client plugin instance and check the “Enable ESPresense Support” checkbox on it’s setup before continuing.
ESPresense is a firmware for devices like ESP32 or similar devices that can read the signals from many bluetooth devices and give an approximate signal strength and therefore an approximate distance that blue tooth device is from the ESPresense device. With several of these in strategic positions and a little tweaking of their settings it is possible to get a good idea what room or area a device currently is. This has many excellent use cases about when to turn off lights, or when not to, or who is present approximately where. I don’t think I would recommend this for turning on lights as it can sometimes take a few seconds for everything to figure out what the closest ESPresense device is.
In order to have a useful system several ESPresense receivers will likely be needed. Luckily there are many supported boards which are all available relatively inexpensively in multi-packs on amazon, ebay or elsewhere. The settings in the devices will almost certainly need some adjustment and experimenting with. This is not meant to be a tutorial for loading the firmware, nor configuring the individual ESPresense devices. Please spend some time on the ESPresense website to get a handle on their usage.
Theory Of Operation:
Each of the ESPresense receivers sends a packet to the MQTT server with each reception of a blue tooth advertisement or other message that they might process. This gives an approximate distance from the receiver based on signal strength and is adjustable in the individual ESPresense devices settings.
Those measurements are kept in the XTension Device Presence Unit as documented below. Every second the Device Presence unit walks the list of it’s current messages, removing any that are older than the timeout as set in the Unit Settings. The one with the shortest distance is selected as the “room” where your Blue Tooth device is currently located.
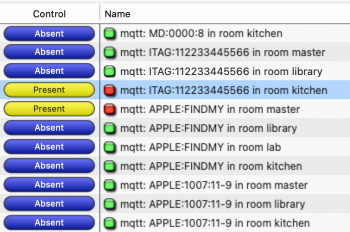
In addition to the Presence Unit linked to the individual Blue Tooth device the plugin will also create a Location Unit for each device and each receiver that has ever seen it. So if you have 3 receivers and a single IPhone, you will get a Device Presence Unit for the iPhone, and a Location Unit for the iPhone at each of the 3 receivers. This way you can more easily find out if a device is in a specific place via scripting and to more easily execute scripts based on the Blue Tooth devices entering or exiting a specific area. The on/off logic of these follows the logic above for how the Presence Unit decides which room it is in. As it is changing it’s label to show the name of the room, the Location unit for that Blue Tooh Device in that “room” will be turned on and since a Blue Tooth device should only be in one place at a time all other Location Units for that Blue Tooth Device are turned off.
If you wish to know if any of your tracked devices are in a specific room I recommend creating a Group that contains all the Location Units for any Blue Tooth Devices in that room. In the Behavior Options in the State Change popup select “On When Any Units Are On” Now if any of the Location Units you placed into the group are in the room the Group will show as on. If you also check the “Scripts run when autochanged” Then the Group’s On script will run when the first person enters the room and the Off script will run after all the Location units in the list have either timed out or their Blue Tooth devices have moved to other rooms.
As of this moment there is no direct access to the other readings like the estimated distance or signal strength and so forth. If this is a data point you would like to have access to I can certainly add that in a future release. Please let me know. No attempts at triangulating or other processing on the distances other than just looking for the receiver you are closest to is done. This is also something that might be added in the future but the various examples I can find online are rather specific and might not generalize to a higher level implementation like this. If you can figure something out differently please let me know.
ESPresense Device Settings:
 As of this writing the Safari browser does not work to load firmware onto them. The Chrome browser works great. There are several ways to load the firmware onto the device. I believe the browser based flashing tool at their website is the easiest but it does have some quirks. In my case it would reliably never reconnect after setting the WiFi name. If it sticks on the spinning wait icon for too long after setting this just hit escape to close that window and click the connect button again. It will then connect properly and offer to let you continue to configure the device.
Once the ESPresense devices are loaded and setup on your WiFi they will present a configuration screen via their built in web server. There does not appear to be a way to set a static IP for them that I can obviously see on the configuration screen so it may be important to make a note of the network name they advertise so you can more easily reach them for making configuration changes. The IP address does not matter to XTension as they are making an outgoing connection to the MQTT server and there is no direct connection between XTension and them.
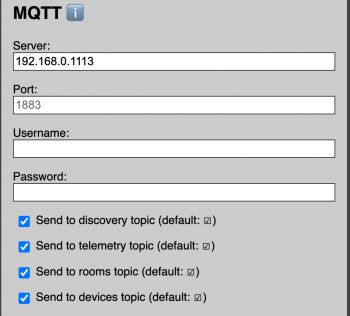
There are many ways to adjust and extend the devices here but the only one that is directly important to using with XTension is setting up a connection to the MQTT server that you have already setup when you visited the plugin documentation for the XTension MQTT Client Plugin.
As of this moment the XTension MQTT plugin does not support authentication to the MQTT server so the server must be setup with anonymous connections enabled and no name or password set in the settings. Since most MQTT servers for home automation purposes are running inside your own local subnet this may not be a problem. I will be supporting this in the future, please get in touch if you need this moved up the list in order for you to be able to use this.
Please use a static IP for the MQTT Server and not a .local or other name here. This will make it easier to avoid connection problems later.
It may not be necessary to have all the “Send To” checkboxes visible in the screenshot checked as XTension does not use the Home Assistant topics, only the ones that come directly from the various ESPresense receivers. They all default to on and I would leave them on to avoid issues until you have it all working in the first place.
Click the Save button and then the Reboot Device button for your changes to take effect. When the device rejoins the network the information will start flowing to the server and from there to XTension.
XTension Settings:
 The only XTension configuration currently necessary is to check the Enable ESPresense Support checkbox in the Edit Interface dialog for your MQTT Client Plugin. For the initial setup you should leave checked the Automatically Create Units As They Are Discovered checkbox though when you have the devices you are interested in setup you can uncheck this so as not to create units for every bluetooth capable device that wanders into the house or within range of one of your receivers. There is also a convenient link to this wiki page should you need to reference it during the setup.
If the MQTT Interface is already running when you enable the ESPresense support you will need to disable and re-enable the interface for the changes to take effect.
XTension Presence Units:
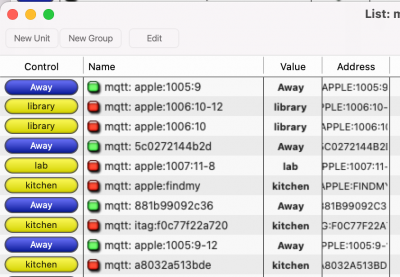
For each individual Blue Tooth device that any ESPresense sees on the network an XTension Device Presence unit will be created. They will be added to a List in XTension named “mqtt Device Units”
The on/off state of the Unit will reflect if it is seen on any of your ESPresense receivers within it’s timeout period.
The default label of the Unit will show the name of the “room” that is it closest to of all the ones that are reporting.
The Last Activity of the Unit currently shows when it last changed from present to absent or vice versa and not when it last changed rooms though this may change in the future.
Since the default label of the Unit shows the name of the room these Units are easy to use in Views or Web Interfaces to show the current location of the a blue tooth device. You can also get the current label via a script if you wish with a syntax like:
write log (xtCurrentLabel of xUnit “mqtt: apple:1005:9-37”) as text
Due to the vagaries of AppleScript it may or may not be necessary to include the “as text” after getting the property of the Unit.
XTension Presence Unit Settings:
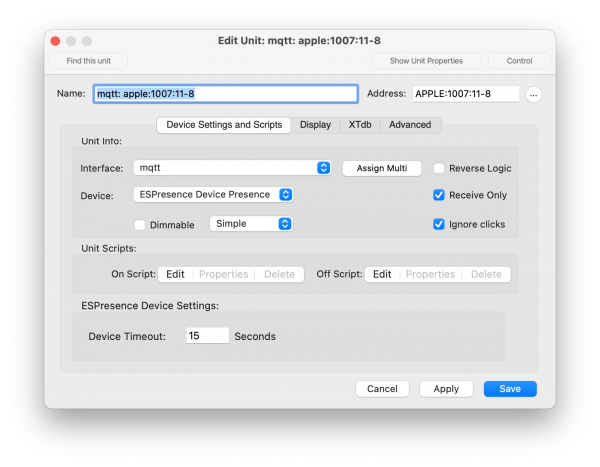
Automatically created units will be created with the name of the MQTT Plugin Instance and then the name of the device as sent by the ESPresense receivers. Once the Unit is created you can edit it to have a more descriptive name like “Jamie’s IPhone” or whatever is appropriate. Do not change the Unit Address as this is how the messages to this unit are routed. You may also change the Off Label in the Display from “Away” to whatever you wish it to show when the device is not seen on the network. If you add an On Label then that will override the default label of room name that would otherwise be displayed as the unit value. So if you don’t care what room a Blue Tooth device is in you may wish to set an On Label of just “Present” or “Found” or whatever makes sense. Setting the On Label back to empty will return the default behavior of showing the room.
The only ESPresense specific setting is the Device Timeout. This defaults to 15 seconds. This is how long since any measurement from any ESPresense receiver was received. If nothing is received in this amount of time the Presence Unit is turned off. Most powered devices advertise themselves fairly often but others might be much lower powered or sleep for a longer time. It may be necessary to increase this timeout for some devices in order to not have them bounce between away and present somewhere. Some experimentation maybe necessary.
XTension Location Unit Settings:
 There are currently no specific settings for the Location Unit. One is created by each ESPresense receiver or each Blue Tooth device that it sees. See the Theory Of Operation section above for more information.
Automatically created Units are created with a name that is the name of the MQTT Interface, the device ID as set by the ESPresense receivers followed by “in room” and the room name that you gave to the specific ESPresense receiver. Once the Unit is created you can edit it and give it a more descriptive or useful name. You may also change the On and Off Labels from the default of Present and Absent if you wish.
Do not change the Unit Address. It is made up of the Blue Tooth id as figured out by the ESPresense receivers followed by a colon and then the name of the room. All changed to uppercase. If you wish to create a Unit manually this is the important thing to get right, all other settings can be whatever makes sense to you.
The timeout for the Location units is the same as that you set in the individual Blue Tooth device Presence Unit above.
Using Sensors:
In addition to sending location information the ESPresense devices have a long list of supported sensor types for everything from motion to temperature and much more. There is no direct support for them in XTension, they will not auto create because some of the fields for them exist in the MQTT data even if they are not configured so you would be stuck with a lot of useless Units.
I have only experimented with them on a rather fundamental level but it appears that they all get a more standard, non-json entry and topic in the MQTT server. This can be added to XTension via one of the top level MQTT Units as described on the MQTT Client Plugin page.
Motion Sensing:
To read a connected pir motion sensor the topic path seems standardized to “espresense/rooms/{your room name}/pir” so for the unit in my lab named “lab” the topic would be: “espresense/rooms/lab/pir” The data payload seems to be either “ON” or “OFF”.
Create a new Enumerated Unit on the MQTT interface. Set it’s enumerations to “OFF,ON” and it’s topic path to “espresense/rooms/lab/pir” Note that ESPresense is spelled with an s instead of a c as you will type if you’re not thinking. I can’t tell you how long it took me to figure out why that wasn’t linking to the correct topic! So, esprsense, like you’re sensing something, and not espresence as in something is present. Also check the “Receive Only” and “Ignore Clicks” checkboxes for the Unit so it will display properly as a Unit that cannot be controlled. Save the Unit and trigger the motion sensor to see if change state.
Temperature:
To read an attached temperature sensor it seems the topic path might be “espresense/rooms/{your room name}/temperature” Create a new Numerical Unit on the MQTT interface. Check the “Dimmable” checkbox so it can hold a numerical value and not just on and off. Set the topic path to “espresense/rooms/lab/temperature” but replace “lab” with your room name. Check the Receive Only and Ignore Clicks buttons here as well as this is not a 2 way device. Save the unit and wait for a temperature update and it will be displayed. You might not have to wait for a temperature update depending on it sending a retained message or not.
Humidity:
A Humidity sensor would work the same way as the temperature sensor but the topic path would be “espresense/rooms/{your room name}/humidity”
Everything Else:
After you setup a sensor on your ESPresense receiver visit the MQTT Explorer app as discussed on the main MQTT page to see exactly what it’s topic path are and how it’s data is sent. Choose the best unit type from whats available on the MQTT page. If there are any problems with any of that, or if any data is not easily receivable with that please send me examples of the payloads and as much information as possible about what you’re trying to do and I will make it work if at all possible.
History:
- The ESPresense support in the MQTT Plugin was added to XTension in January of 2023 in XTension version 9.5.1.

